
Introduction
How to Install Grab Bars Without Studs Your stud finder just confirmed it: there’s no stud anywhere near where the grab bar actually needs to go. That doesn’t mean the project is dead — it means you need the right anchor, not a stud.
Table of Contents
Bathroom falls are common enough that the CDC tracks older adult fall prevention as an ongoing public health priority, and home safety modifications like grab bars are one of the interventions it points to — which is exactly why getting this installation right matters more than getting it fast.
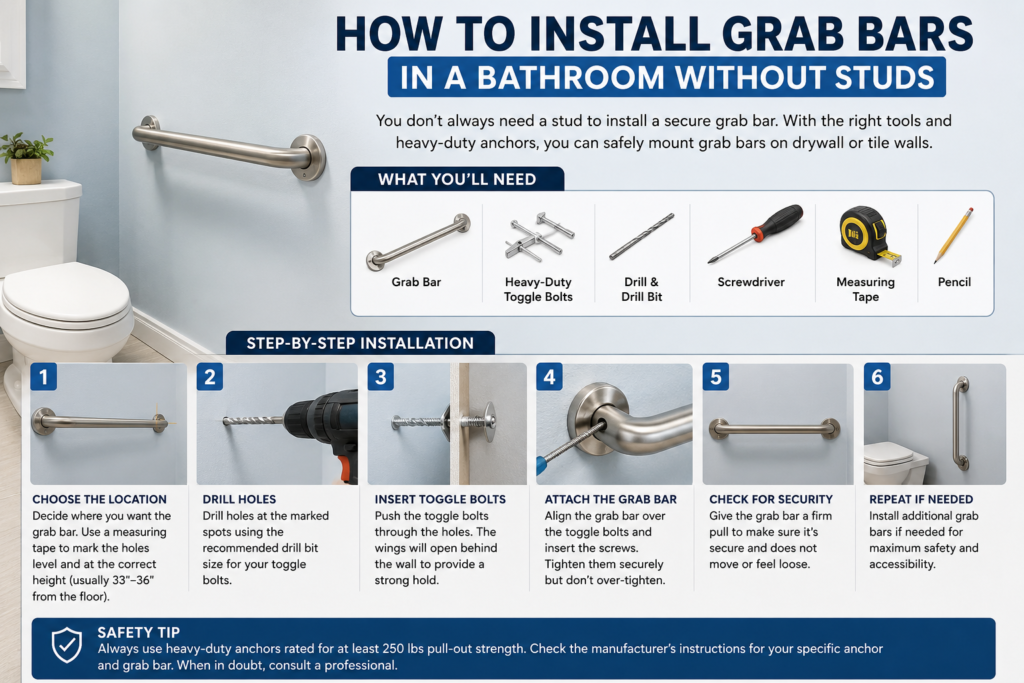
Quick Answer: Yes, you can safely install a grab bar in drywall without hitting a stud, using load-rated hollow-wall anchors (toggle bolts or speciality grab-bar anchor systems) instead of wood screws. The anchor and installation together must support 250 pounds of force, matching the ADA structural standard for grab bars.
What You Need to Know
- Stud mounting is still the strongest option when the framing lines up—but it’s not the only safe option.
- Load-rated anchors, not plastic wall plugs, are what make a no-stud install safe for body weight.
- Height matters as much as the anchor: 33 to 36 inches from the floor is the standard range for horizontal bars.
- A pull test before first use is the one step most DIY installs skip — and it’s the one that catches a bad install before someone’s weight does.
- Not every wall is a viable no-stud candidate — tile-over-unknown-backing and damaged drywall are reasons to call a pro.
Grab Bar vs. Handrail—What’s the Difference?
A grab bar is a short, fixed support rail designed to bear sudden body weight during a slip, sit, or stand—the kind installed beside a toilet or inside a shower. A handrail is a longer, continuous rail meant for ongoing grip while walking, like along a staircase or ramp.
The distinction is relevant for installation because grab bars are engineered and tested for sudden, concentrated pull-out force, while handrails are rated for continuous, distributed load along their length. A grab bar and a handrail are not interchangeable products, even though both mount to a wall.
What Are the Two Requirements for a Safe Grab Rail Installation?
The two requirements are secure structural anchoring and correct placement. Everything else in this guide supports one of those two things.
Structural anchoring means the bar, its fasteners, and the wall material behind it can together resist 250 pounds of force without pulling loose—the benchmark used in the ADA Standards for Accessible Design, Section 609. Correct placement means the bar sits at a height and location that actually intersects the hand path someone uses during a real slip or transfer, not just wherever the wall happens to be open.
Skip either one and the bar looks installed but isn’t actually doing its job.
What’s the Correct Height for a Bathroom Grab Bar?
Horizontal grab bars should sit 33 to 36 inches above the finished floor, measured to the top of the gripping surface. This range comes from the ICC A117.1 accessibility standard referenced by ADA guidance, and it’s based on research into where adults naturally reach during a sit-to-stand or slip-recovery motion.
Vertical bars follow a different rule: the bottom of the bar typically starts around 39 to 41 inches up, positioned to catch a hand reaching during a stumble rather than a seated grip. If you’re installing near a toilet specifically, measure from the finished floor — not the subfloor — since tile thickness changes the math.
Best Anchors for Drywall With No Stud
Not all hollow-wall anchors are built for the same job. A picture-hanging anchor and a grab-bar anchor look similar and are not remotely the same product.
| Anchor Type | Typical Wall Fit | Best For | Weak Point |
|---|---|---|---|
| Plastic expansion anchor | 1/2″ drywall | Light-duty, non-safety items | Not rated for body-weight pull-out — avoid for grab bars |
| Standard toggle bolt (1/4″) | 1/2″–5/8″ drywall | Common no-stud grab bar mounting | Requires a large pilot hole; weakened if drywall paper face tears during installation |
| Heavy-duty toggle / strap toggle | 1/2″–5/8″ drywall | Higher pull-out resistance in the same wall | Slower to install, needs precise hole sizing |
| Speciality grab-bar anchor systems (e.g., SecureMount-style) | Drywall, fibreglass, tile-over-drywall | Purpose-built for grab bars, often rated with the bar as a tested system | Usually tied to a specific bar brand — check compatibility before buying separately. |
| Wood screw into stud | Any wall with accessible framing | Highest, most dependable pull-out resistance | Only works where the stud actually lines up |
Toggle bolts distribute load by opening behind the wall, which is why hardware manufacturers commonly rate a properly installed 1/4-inch toggle bolt for meaningfully higher pull-out resistance than a plastic anchor in the same drywall—but the exact number varies by manufacturer and drywall thickness, so check the package rating rather than assuming a figure.
Save or screenshot this anchor comparison table—it’s the fastest way to match your wall to the right hardware before you’re standing in the aisle at the hardware store.
Step-by-Step: Installing a Grab Bar in Drywall Without a Stud
1. Find the nearest stud, even if it’s not exactly on target.
Studs typically sit 16 or 24 inches on centre. Knowing where the closest one is lets you shift the bar’s mounting holes by an inch or two to catch at least one screw in solid wood—partial stud contact is still stronger than an anchor alone.
2. Choose an anchor rated for the wall thickness and expected load.
Match the anchor to your actual drywall thickness (usually 1/2 inch in bathrooms) and confirm the package states a pull-out rating suitable for safety equipment, not general hanging use.
3. Mark and level the bar’s mounting holes.
Hold the bar at 33 to 36 inches from the finished floor, use a level to confirm it’s horizontal, and mark each screw hole with a pencil.
4. Drill pilot holes sized to the anchor, not the screw.
Toggle bolts need a larger hole than the screw itself so the toggle wings can pass through folded—check the anchor packaging for the exact bit size before drilling.
5. Insert and seat the anchors fully.
Push the anchor through until the toggle wings spring open on the backside of the drywall, then pull back gently until you feel it seat flush against the interior wall surface.
6. Mount the bar and tighten evenly.
Drive each screw in stages, alternating between mounting points, so the flange pulls down evenly instead of torquing on one side first.
7. Pull-test the bar before anyone uses it.
Brace yourself and pull hard in the direction someone would actually grab—down and outward, not just straight down—for at least 10 to 15 seconds. Any flex, popping sound, or visible wall movement means stopping and re-anchoring before it’s used.
Common Grab Bar Installation Mistakes
- Using a plastic wall anchor instead of a load-rated toggle or speciality anchor — the single most common cause of grab bar failure.
- Drilling before checking for plumbing or electrical lines behind the wall, especially near tub and shower plumbing runs.
- Over-tightening screws until the drywall paper face tears, which quietly destroys the anchor’s holding power even though the screw looks tight.
- Mounting at a height that “looks right” instead of measuring 33 to 36 inches, which puts the bar out of reach during an actual slip.
- Skipping the pull test, which means the first real-world load test happens when someone’s already relying on the bar.
Positioning and Reach
Height is only half the placement equation — where the bar sits relative to the toilet, tub, or shower entry determines whether it’s actually usable during a real transfer. Our guide to bathroom grab bar mounting options breaks down horizontal, vertical, and angled placement for each fixture type.
Choosing a Bar Rated for No-Stud Mounting
Not every grab bar on the shelf is designed with anchor-only mounting in mind — some are engineered and load-tested specifically as a bar-plus-anchor system, which matters when there’s no stud backing them up. Look for a bar that states a tested weight rating with its included anchors, not just a rating that assumes stud installation.
Our breakdown of heavy-duty grab bars covers which models are built and rated for exactly this scenario—no single product is pushed here, since the right pick depends on your specific wall and bar length.
FAQs
What are the two key requirements when installing grab rails in a bathroom?
A secure grab rail installation depends on two essentials: strong structural support and proper positioning. The bar should be attached to a wall structure or a load-rated anchoring system designed to withstand the forces created when someone grabs it to prevent a fall, sit down, or stand up. It should also be installed at a height and location that provides comfortable, practical support for the person using it.
What are the most common grab bar installation mistakes?
Several installation errors can reduce the safety of a grab bar. Common problems include using ordinary plastic anchors that are not designed for grab bars, failing to check for hidden plumbing or electrical wiring before drilling, damaging drywall by overtightening fasteners, placing the bar too high or too low, and not checking the finished installation for movement. Always follow the grab bar and anchor manufacturer’s installation instructions.
What is the difference between a handrail and a grab rail?
A grab rail or grab bar is designed to provide firm support when a person needs to steady themselves, recover from a loss of balance, or transfer between sitting and standing. A handrail is generally a longer, continuous rail intended to help people maintain balance while walking, such as beside a staircase or ramp. Although both provide support, their intended uses and installation requirements can be different.
What is the proper height for bathroom grab bars?
For accessible installations following ADA requirements, horizontal grab bars are commonly installed 33 to 36 inches above the finished floor, measured to the top of the gripping surface. The exact location can vary depending on the type of grab bar, bathroom fixture, wall configuration, and applicable accessibility requirements. Vertical bars may be positioned differently to provide support where a person enters, exits, or transfers.
Can a grab bar hold body weight without being attached to a stud?
Yes, a grab bar does not always have to be attached directly to a wall stud. However, the alternative must be a properly rated grab-bar anchoring system that is compatible with the wall construction. Standard plastic drywall anchors should not be treated as adequate support for a safety grab bar. Toggle-style and speciality anchors may be suitable when their manufacturer specifically rates them for the intended application and they are installed correctly.
How much weight can a toggle-bolt-mounted grab bar support?
There is no single weight rating that applies to every toggle-bolt installation. The actual capacity depends on the fastener, wall material, drywall thickness, anchor design, installation method, and condition of the wall. Rather than relying on a general weight estimate, check the manufacturer’s published load or pull-out rating and make sure the complete grab bar anchoring system meets the required specifications.
What to Do Next
Before drilling, determine the best location and mounting method for your bathroom. Our guide to bathroom grab bar mounting options can help you compare different installation approaches. If you’re working with limited wall space, explore grab bars for small bathrooms to understand placement considerations for compact layouts. And if you still need to select a bar, how to choose bathroom grab bars explains the features and specifications worth considering before installation.