
Introduction
Bathroom Grab Bar Mounting Options. You’ve got a grab bar in the box, and now you’re standing in the bathroom trying to figure out how it actually attaches to the wall. Not every grab bar goes in the same way, and picking the wrong method is how bars end up loose, wobbly, or pulled clean out of the drywall. Here’s every mounting option, what wall it needs, and how much weight it can actually hold.
Table of Contents
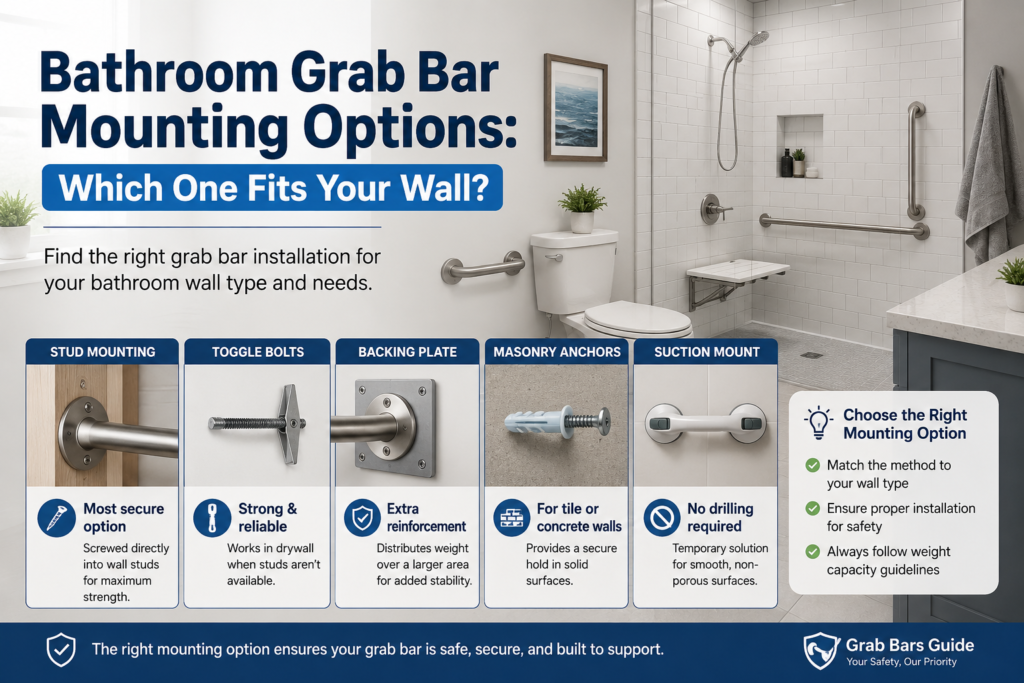
Quick Answer: Bathroom grab bars mount four ways: into wall studs (strongest, requires drilling), with toggle bolts or a backing plate when there’s no stud, into tile or masonry with wall anchors, or with suction cups for a no-drill option. Stud mounting holds the most weight; suction holds the least and suits renters or temporary use only.
What You Need to Know
- Mounting into a wall stud is the strongest option and the one most safety guidance defaults to.
- Is there no stud located where you need to install the bar? Toggle bolts or a backing plate is the real fix—not a longer screw.
- Tile and masonry walls need their own anchor type, different from drywall or stud fixings.
- Suction-mounted bars require no drilling but carry the lowest weight rating and aren’t meant for full body-weight support.
- Weight ratings vary by mounting type, not just by the grab bar itself — the wall connection is what actually holds the load.
The CDC’s Older Adult Fall Prevention data shows that more than one out of four older adults falls each year, highlighting the importance of getting the mounting method right—not just the grab bar itself.
Mounting Into Wall Studs
Screwing directly into a wall stud gives a grab bar its highest weight capacity, commonly rated up to 250 pounds or more when installed correctly. This is the method most installation guidance treats as the standard, because the stud — a solid piece of framing behind the drywall — carries the load instead of the drywall itself.
To find a stud, use an electronic stud finder along the wall where the bar needs to go. Studs typically run every 16 inches on centre in US residential construction, so once you find one, you can often predict the next. Mark the centre of each stud with a pencil before drilling.
The catch is that your ideal bar position may not always align with the actual location of the studs. That mismatch is the single most common reason people give up on stud mounting and reach for the wrong workaround—usually just longer drywall screws, which won’t hold under real weight.
No Stud? Toggle Bolts and Backing Plates
When a stud isn’t available where you need the bar, toggle bolts or a backing plate are the correct fix — not a hollow-wall anchor rated for picture frames. This directly answers one of the most common questions people search for when they hit this exact wall.
Toggle bolts work by expanding a metal wing behind the drywall once the bolt passes through, spreading the load across a wider area of the wall instead of a single point. They’re rated for moderate to high loads depending on the size and brand, but they’re still working with drywall, not framing, so they don’t quite match a direct stud connection.
A backing plate is the sturdier option: a piece of plywood or metal installed behind the drywall, spanning between two studs, that gives you a solid surface to screw into anywhere along its width. This requires opening the wall — usually only practical during a renovation or if you have access from an adjacent closet or crawlspace — but it’s the closest you’ll get to stud-level strength without the position constraint.
Tight layouts make this positioning problem worse, since there’s less wall to work with in the first place — our guide on grab bars for small bathrooms covers placement strategies when space is limited.
Don’t substitute standard drywall anchors here. They’re built for light, static loads like shelves, not the sudden pulling force of someone catching their balance.
Mounting Into Tile or Masonry Walls
Tile-over-concrete or solid masonry walls need expansion anchors or shield fixings designed for dense material, not drywall hardware. The tile itself carries no structural weight — the anchor has to reach into the masonry or concrete behind it.
Drilling through tile takes a different approach than drilling into drywall or wood. A diamond-tipped or carbide masonry bit prevents the glaze from cracking, and drilling at low speed reduces the heat and pressure that cause chips at the edge of the hole. Some installers apply a strip of masking tape over the drill point first to help the bit bite without skating across the glazed surface.
Once through the tile, the anchor needs to sit in solid material — brick, block, or poured concrete all work — with the hole drilled slightly deeper than the anchor’s length so debris doesn’t prevent full seating. A shallow or debris-filled hole is one of the most common reasons masonry anchors fail to hold their rated load.
Suction-Mounted (No-Drill) Grab Bars
Suction-mounted grab bars attach without any drilling, but they carry the lowest weight rating of any mounting option and depend entirely on a smooth, non-porous surface. They’re built for situations where drilling isn’t possible or allowed—rental units, temporary recovery after surgery, or travel.
The suction only holds on tile, glass, fibreglass, or acrylic—never on textured tile, wallpaper, or painted drywall, since air can leak in through any surface irregularity and break the seal. Manufacturers generally recommend checking suction strength before every use, since grip weakens gradually and won’t announce itself with a warning.
Here’s the fact worth knowing before you rely on one: a suction bar that feels solid when you tug it gently can still fail under a sudden, sideways pulling force—which is exactly the kind of force someone applies when they’re actually losing their balance, not just testing the bar. Suction mounting suits light, confidence-boosting support. It’s not a substitute for a stud-mounted bar for anyone who needs to bear real weight during a fall recovery.
Grab Bar Mounting Options Compared
| Mounting Type | Requires Studs? | Drilling Required? | Typical Weight Rating | Best For |
|---|---|---|---|---|
| Into wall studs | Yes | Yes | Up to 250+ lb (113+ kg) | Permanent installs, full body-weight reliance |
| Toggle bolts / backing plate | No | Yes | Moderate–high, varies by anchor | Bar position doesn’t align with a stud |
| Masonry / tile anchors | No (uses solid wall behind tile) | Yes | High | Tiled walls over concrete or block |
| Suction-mounted | No | No | Low–moderate, varies by model | Renters, travel, temporary or light support |
Save or screenshot this mounting comparison — it covers every wall type you’re likely to run into during a bathroom install.
How High Should a Grab Bar Be Mounted?
Most installation guidance places grab bars between 33 and 36 inches (about 84–91 cm) from the finished floor, adjusted to the individual user’s height and reach. This range matches the U.S. Access Board’s ADA Standards, which specify 33 to 36 inches above the finish floor measured to the top of the gripping surface—a benchmark residential installs commonly follow even outside commercial ADA requirements, since it supports natural sit-to-stand and standing-balance movements without forcing the user to overreach or hunch down.
The exact height should shift based on who’s using the bar—a taller user or one who needs the bar closer to standing height may need it mounted a few inches higher, while someone using it primarily for sitting transfers may need it lower. Measure from the finished floor, not the subfloor, since tile or flooring changes the reference point.
Horizontal, Vertical, or Angled?
Orientation depends on the movement the bar needs to support—horizontal bars assist standing and lateral balance, vertical bars assist rising and lowering, and angled bars combine both for tight spaces like bath entries. This mounting guide focuses on how bars attach to the wall; for a full breakdown of when to choose each orientation, see our guide on whether grab bars should be horizontal or vertical.
Common Mounting Mistakes
A few other mistakes show up consistently:
- Using picture-frame anchors for a grab bar. These are rated for a few pounds of static weight, nowhere near what a grab bar needs to survive a real fall-arrest moment.
- Skipping the pull test after installation. Apply firm, sudden pressure in the direction someone would actually pull during a fall, not just a gentle tug.
- Drilling into tile without a masonry bit. A standard bit cracks the glaze and can compromise the anchor’s grip in the hole underneath.
- Guessing at stud location instead of verifying it. A stud finder plus a small verification hole is more reliable than tapping the wall and listening for a change in sound.
When to Call a Professional
Not every wall is a straightforward mounting job, and it’s worth being honest about when this becomes a job for a contractor rather than a weekend project. Walls with no accessible stud near the needed location, older plaster walls, metal stud framing, or any situation where the person using the bar needs to fully rely on it for weight-bearing support are all good reasons to bring in a professional installer or occupational therapist for a home safety assessment.
Once you know which mounting method your wall actually supports, the next decision is which grab bar style and material fit the job—our guide on choosing bathroom grab bars walks through that, including the hardware that pairs with each mounting type.
FAQs
Where Should Bathroom Grab Bars Be Mounted?
Bathroom grab bars are generally most useful beside the toilet, near the shower or bathtub entrance, and inside the bathing area where a person needs extra stability. The best location depends on where support is needed during sitting, standing, entering, exiting, or changing position. Installing bars at these key points can make everyday bathroom movement safer and more comfortable.
Do Bathroom Grab Bars Have to Be Attached to Studs?
Mounting directly into wall studs is one of the strongest installation methods, but it is not always possible. When a stud is not positioned where the grab bar needs to be installed, appropriate alternatives may include properly rated toggle bolts, reinforced backing, or anchors designed for masonry or other specific wall materials. The fastener and mounting system should always match the wall construction and the grab bar’s weight rating.
Is It Better to Install Grab Bars Horizontally or Vertically?
The ideal orientation depends on the location and the type of assistance the user needs. Horizontal grab bars can provide useful support when standing, sitting, or moving sideways, while vertical bars can offer a stable handhold when entering a shower or bathtub. In many bathrooms, combining horizontal and vertical bars provides support for different movements and locations.
How High Should Bathroom Grab Bars Be Installed?
A commonly referenced installation range is about 33 to 36 inches above the finished floor, particularly when following ADA-based commercial bathroom guidance. However, the most comfortable height for a residential bathroom can vary according to the user’s height, mobility, and intended use. Always measure from the finished floor and consider the actual position in which the person will use the grab bar.
Can a Grab Bar Be Installed Without Drilling?
Some suction grab bars can be attached without drilling, but they are designed for specific smooth, non-porous surfaces and should not automatically be treated as a replacement for a permanently secured grab bar. Surface condition, product specifications, and weight limitations are important. For situations where someone may put substantial body weight on the bar, a properly anchored permanent installation is generally the safer choice.
What Tools Are Needed to Install a Bathroom Grab Bar?
The tools depend on the wall material and mounting method. A typical installation may require a tape measure, level, stud finder, drill, suitable drill bits, and the correct mounting hardware. Wood studs, tile, drywall, concrete, and fibreglass may each require different drilling techniques and fasteners, so choose hardware specifically rated for the surface you’re working with.
What to Do Next
After choosing the appropriate mounting method, consider how the grab bar will actually be used. Our guide on horizontal vs. vertical grab bars explains how orientation can affect support in different bathroom locations.
You can also learn more about choosing the right bathroom grab bar based on bar style, location, and installation requirements. If you’re wondering whether grab bars are legally required, our guide to bathroom grab bar requirements explains when accessibility standards apply and how they differ between public facilities and private homes.