
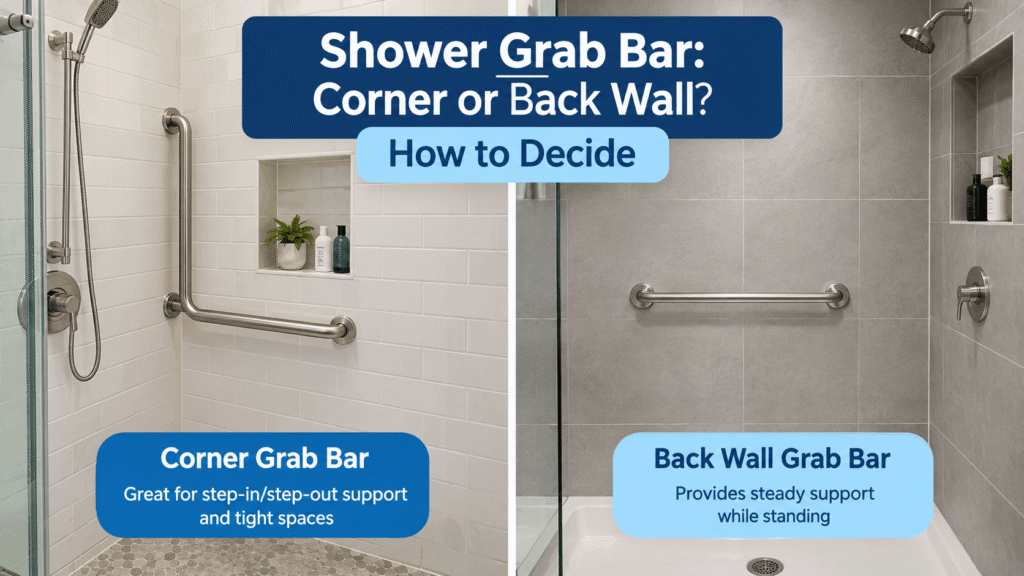
Introduction
Shower Grab Bar: You’re standing in the shower with a stud finder in one hand and a grab bar in the other, looking at two walls, and you genuinely can’t tell which one should get the bar. That’s precisely the right moment to stop and get this right—a grab bar mounted on the wrong wall gets ignored the first time someone actually reaches for it mid-fall, which defeats the entire point of installing one.
Table of Contents
Quick Answer: In most showers, a back wall grab bar—at least 36 inches long, mounted 33 to 36 inches high—is the standard default for standing balance. A corner or diagonal bar becomes the better choice, and occasionally the only option, in neo-angle showers or when the back wall is too short to fit a proper-length bar.
What You Need to Know
- Shower shape decides the wall, not preference—a neo-angle stall often physically can’t fit a code-length bar on its short back wall.
- Per archive.ada.gov, a back wall grab bar must be at least 36 inches long, and a side or control wall bar at least 54 inches long, both mounted 33–36 inches high.
- A corner bar supports a diagonal, pivoting motion—stepping and turning at once—that a flat horizontal bar can’t.
- The most common mistake isn’t picking the wrong wall; it’s mounting into tile without confirming a stud or blocking behind it.
- Most bathrooms end up safer with both a back wall bar and a corner or entry bar, not one instead of the other.
Why This Decision Actually Matters
This isn’t a cosmetic choice, and it’s worth being blunt about why. According to the CDC’s Older Adult Fall Prevention programme, falls are the leading cause of injury-related death among adults aged 65 and older, and the age-adjusted fall death rate climbed 21% between 2018 and 2024. A grab bar that’s mounted somewhere the hand doesn’t naturally reach during the actual moment of imbalance offers almost none of that protection, no matter how sturdy the bar itself is.
That’s the entire reason the corner-versus-back-wall question deserves more than a coin flip. The two walls support genuinely different movements, and getting the match wrong is functionally the same as not having a bar there at all.
Corner vs Back Wall: The Short Answer
The back wall is the default because it’s where most people stand still longest—washing, rinsing, and facing the water. A corner bar matters most during the seconds someone is moving, not standing still: stepping in, turning toward the spray, or lowering onto a shower seat. A back wall bar handles standing balance; a corner bar handles the moment someone is actually moving.
That’s the real split, and it’s why the two options aren’t competing with each other so much as covering different halves of the same routine. If you can only install one bar right now, pick based on which risk worries you more: losing balance while standing and washing or losing balance while stepping, turning, or sitting down.
Why Shower Shape Decides This, Not Preference
This is the part every other guide skips, and it’s the part that actually determines the outcome. The physical shape of your shower stall decides which wall is even capable of holding a proper-length bar—personal taste has almost nothing to do with it.
Neo-angle or corner showers
These stalls have two short angled walls meeting at a point and frequently no single flat wall long enough to fit a 36-inch bar. A diagonal bar mounted across the corner itself is often the only placement that meets a reasonable minimum length at all, which makes this less a design choice than a geometry problem.
Rectangular three-wall alcove showers
The back wall here usually runs the full width of the tub or stall—plenty of room for a 36-to-42-inch bar mounted at standard height. This is the classic scenario where “back wall wins”, and it’s why most general placement guides default to recommending it without qualification.
Walk-in showers with a built-in seat
Here, the wall directly behind the seat takes priority over both corner and standard back-wall placement, because a seated user needs support within arm’s reach of where they’re actually sitting, not across the stall.
Shower Shape → Recommended Wall(s)
| Shower Shape | Primary Wall | Why | Typical Bar Length |
|---|---|---|---|
| Neo-angle / corner stall | Corner (diagonal) | Often the only wall long enough | 24″–36″ diagonal |
| Rectangular 3-wall alcove | Back wall | Full-width wall, standard entry point | 36″–42″ |
| Walk-in with built-in seat | Wall behind the seat | Seated reach takes priority. | 24″–32″ |
| Any shape, near entry | Entry/side wall (add-on) | Highest-use bar of all — every entry and exit | 18″–24″ |
Save or screenshot this shower-shaped table — it covers the wall decision for nearly every residential shower layout you’ll run into.
Height and Length Specs for Each Placement
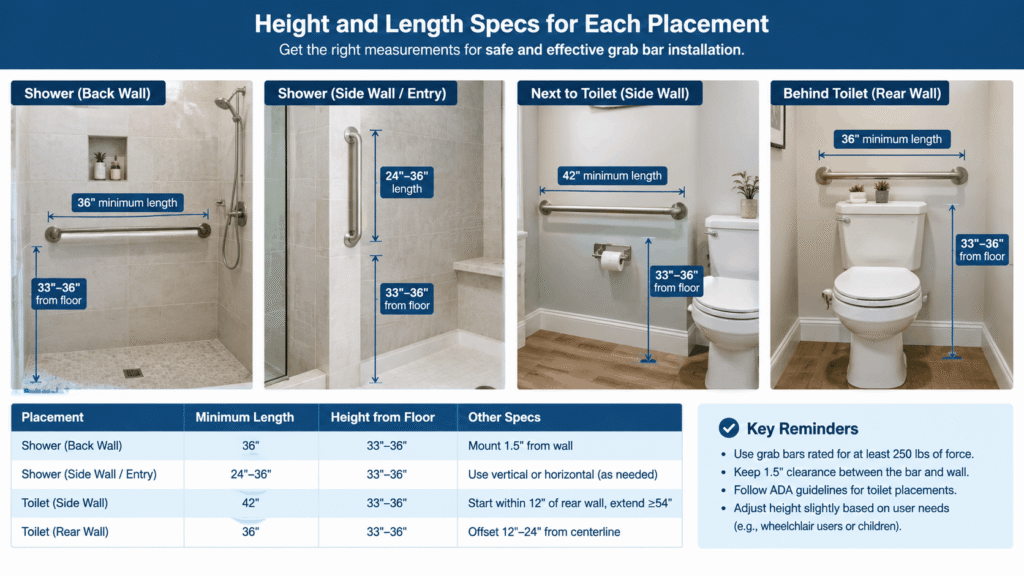
For a roll-in shower, ADA specifications place shower grab bars at 33 to 36 inches above the finished shower floor. This height applies to grab bars installed along the back wall as well as the side or control wall. The same general mounting range can be used when the bar is positioned across a shower corner rather than mounted on a straight wall.
The length of the grab bar also matters. Under the ADA roll-in shower specifications, the back-wall bar needs to be at least 36 inches long, while the bar on the side or control wall needs to extend at least 54 inches. These measurements are primarily associated with accessible commercial facilities, so they should not automatically be treated as residential code requirements. However, they provide useful guidance when planning a home shower because sufficient bar length gives the user more usable support and reduces gaps in reach.
A compact shower can make these dimensions difficult to accommodate on a single straight wall. When wall space is limited, installing a grab bar around the corner may provide a more practical layout and allow the available support area to be used more effectively.
What a Corner Bar Actually Does That a Flat Bar Doesn’t
Should a shower grab bar be horizontal or diagonal? A horizontal bar supports side-to-side weight shifting, which is why it works well for standing balance on a flat wall. A diagonal bar, typically angled around 45 degrees across a corner, supports forward-and-back weight transfer at the same moment as that side-to-side shift.
That combined movement is exactly what happens when someone steps over a shower threshold, pivots toward the water, and reaches out all at once—a single horizontal bar simply doesn’t cover all three motions in one grip. This is the counterintuitive part most buyers miss when they’re comparing the two: a corner bar isn’t a compromise version of a back wall bar; it’s a different tool built for a different kind of movement entirely, and swapping one in for the other doesn’t fully replace what the other was doing.
Common Mistakes When Choosing a Wall
The biggest mistake isn’t the wall you choose—it’s what’s behind it. A grab bar mounted into drywall or tile alone, without hitting a stud or solid blocking, will pull out under real body weight at exactly the moment it’s needed most.
- Mounting by wall preference instead of movement. Choose the wall based on where the hand actually reaches during entry, pivoting, or standing—not which wall looks least cluttered or has the fewest fixtures in the way.
- Skipping the corner bar in a small stall. In a tight neo-angle shower, treating the corner as a last resort often leaves the whole shower with no properly sized bar anywhere.
- Guessing at stud location. If you haven’t confirmed a stud or blocking behind the mounting point, stop before drilling—see how to find a stud behind shower tile for the exact method first.
- Treating the corner and back wall as either/or. Most bathrooms are actually safer with both installed: a back wall bar for standing balance and a corner or entry bar for the transition moments, neither one covering alone.
- Copying a photo instead of measuring the actual wall. A corner placement that looks right in a product photo may not account for your shower’s specific angle, tile layout, or existing fixtures—measure before you commit to a bar length.
What the Rules Actually Say (ADA vs Residential)
ADA figures govern commercial and public-facility bathrooms—they’re a legal requirement there, not inside a private home. In your own bathroom, placement is entirely your call, and no inspector is going to measure your shower wall.
That said, the ADA numbers exist because they were built around documented body mechanics and real fall-prevention research, not bureaucratic preference, so they remain a genuinely useful reference even where they’re not required. If you’re renting out a unit, preparing a home for eventual resale, or working from an occupational therapist’s recommendation, matching the ADA figures is the safer default rather than the exception to reach for.
If You’re Working With a Small or Awkward Shower
Corner and back-wall placement gets more complicated fast when the whole stall is undersized to begin with, since wall-length constraints stack directly on top of reach and turning-radius limits. If that’s your situation, the full breakdown in grab bar placement for a small bathroom walks through the tighter-space version of this same decision, including what to do when neither wall technically meets the standard length.
Want the shower-shape table above, plus the height and length specs, as a single printable reference for install day? We’re building a printable sheet with exactly that for anyone getting ready to drill — worth grabbing before you start rather than mid-install.
When to Call a Professional Installer
Bring in a licensed installer if your wall studs don’t line up with the recommended placement, if you’re installing for someone with a specific mobility need an occupational therapist hasn’t yet assessed, or if you’re working with tile over a shower pan where a bad hole risks a leak rather than just a cosmetic patch. A bar that pulls out of the wall under load causes a fall that’s often worse than the one it was meant to prevent — that’s not a spot to guess and hope.
FAQs
What Is the Best Location for Grab Bars in a Shower?
The right placement depends on how the shower is designed and how a person moves through it. In many showers, using two grab bars provides better coverage: one along the back wall for support while standing and another near the entrance or corner to assist with stepping in, stepping out, and turning. In a neo-angle shower, the corner may become especially important because the available wall space is different from that of a standard rectangular stall.
What Are Common Grab Bar Installation Mistakes?
One of the most serious mistakes is attaching a grab bar without first determining what is behind the wall. Tile, drywall, or another finished surface alone may not provide enough structural support. Installers should identify suitable framing or use properly installed blocking before securing the bar. Other problems include placing the bar where it looks convenient rather than where the user’s hand naturally falls and overlooking corner installation when a small shower has limited straight-wall space.
What Are the Rules for Grab Bars in Showers?
For accessible roll-in showers, ADA specifications call for a minimum 36-inch grab bar on the back wall and a minimum 54-inch bar on the side or control wall. The specified mounting height is generally 33 to 36 inches above the shower floor. These dimensions are intended for facilities covered by ADA accessibility requirements, so they should not automatically be considered mandatory inside a private residence. They can, however, serve as a useful starting point when planning a safer home shower.
Should a Shower Grab Bar Be Horizontal or Diagonal?
The best orientation depends on the movement the bar needs to support. A horizontal grab bar works well when the main goal is maintaining balance while standing or moving sideways along a wall. A diagonal bar can provide a different type of handhold, particularly during movements such as stepping, turning, or changing position. The shower layout and the user’s reach should therefore be considered before choosing the orientation.
Do I Need a Grab Bar on Both the Corner and Back Wall?
Not necessarily. The number and placement of bars should match the shower layout and the movements that need the most support. Two strategically positioned bars can provide broader coverage, with one helping during standing activities and another assisting with entry, exit, or turning. If only one bar can be installed, choose the location that addresses the greatest stability concern rather than simply selecting the most convenient wall.
Can I Install a Grab Bar Myself?
A DIY installation can be possible when you can accurately locate structural framing or install appropriate blocking and securely fasten the mounting hardware. You should also check the planned height, bar length, wall construction, and the manufacturer’s installation requirements before drilling. Extra caution is needed with tiled walls and shower surfaces because an incorrectly drilled hole can damage the finish or create a potential water-intrusion problem. When the mounting location does not align with suitable framing, professional installation may be the safer option.
What to Do Next
Before making any holes in your shower wall, determine where the supporting structure is located. Our complete shower grab bar stud-finding guide explains ways to check for suitable mounting points while reducing the risk of damaging tile.
If you’re dealing with limited wall space, our small bathroom grab bar placement guide covers how the layout can affect where a bar should go.
Already installed a bar in the wrong position? See our guide on removing a grab bar without cracking tile before attempting to reposition it.