
Introduction
Toilet Grab Bar Distance You’ve got a drill in one hand and a tape measure in the other, and you don’t want to put a hole in the wall in the wrong spot. Getting the distance right the first time saves you a patch job and, more importantly, makes sure the bar is actually where a hand will land during a real transfer.
Table of Contents
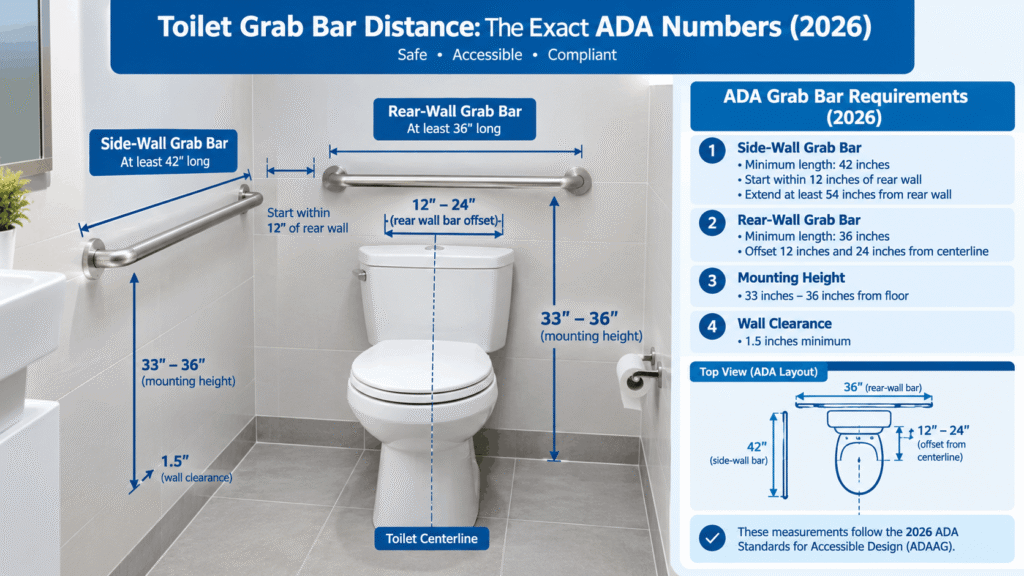
Quick Answer: The side-wall grab bar at a toilet starts within 12 inches of the rear wall and extends at least 54 inches from it. The rear-wall grab bar spans at least 36 inches, running 12 inches to one side of the toilet’s centreline and 24 inches to the other. Both bars mount 33 to 36 inches above the floor, per the ADA Standards for Accessible Design.
What You Need to Know
- Side-wall bar: Minimum 42 inches long, located no more than 12 inches from the rear wall and extending at least 54 inches from the rear wall.
- Rear-wall bar: Minimum 36 inches long, extending at least 12 inches on one side and 24 inches on the other side of the toilet centreline.
- Both bars: The top of the gripping surface should be 33–36 inches above the finished floor, with 1½ inches of clearance between the grab bar and the wall.
- Structural strength: Grab bars must withstand 250 pounds of force at any point on the bar, fastener, mounting device, or supporting structure.
- Residential note: These are ADA accessibility standards primarily applicable to covered public/commercial facilities. Residential requirements can differ, so in a private home these measurements are best treated as an accessibility and safety baseline rather than automatically assuming they are legally required.
How Far Should a Toilet Grab Bar Be Installed?
The distance is measured from two reference points: the rear wall and the toilet’s own centreline — not from the toilet bowl itself. That’s the detail most people get wrong when they start measuring.
For the side-wall bar, the back end starts no more than 12 inches from the rear wall, and the bar has to run at least 54 inches out from that same rear wall. That’s a long bar — it’s built to support someone through the full arc of standing up, not just a single grab point.
For the rear-wall bar, the math centres on the toilet, not the room. The bar extends a minimum of 12 inches on one side of the toilet’s centreline and a minimum of 24 inches on the other — the longer side always faces the open transfer space, where a wheelchair user has room to manoeuvre.
Toilet Grab Bar Distance Chart
Here’s every measurement in one place — inches and centimetres, so it works whether you’re buying U.S. hardware or working from metric plans.
| Bar Location | Minimum Length | Height Above Floor | Start Point | End Point | Wall Clearance |
|---|---|---|---|---|---|
| Side wall | 42″ (107 cm) | 33″–36″ (84–91 cm) | Within 12″ (30 cm) of the rear wall | At least 54″ (137 cm) from the rear wall | 1.5″ (3.8 cm) |
| Rear wall | 36″ (91 cm) | 33″–36″ (84–91 cm) | 12″ (30 cm) min. past toilet centreline | 24″ (61 cm) min. past toilet centreline | 1.5″ (3.8 cm) |
Measure it yourself in four steps:
- Find the toilet’s centreline. Measure from the wall to the centre of the toilet bowl — that’s your reference point for the rear-wall bar, not the edge of the tank.
- Mark the rear-wall bar’s span. From the centreline, mark 12 inches toward the side wall and 24 inches toward the open side. That full span needs a 36-inch bar minimum.
- Mark the side-wall bar’s start. From the rear wall, measure 12 inches along the side wall — the back end of your side bar can’t sit any farther out than that.
- Extend the side-wall bar to 54 inches. From that same rear wall, mark 54 inches along the side wall. Your bar needs to reach at least that far.
Save or screenshot this distance chart — it covers every side-wall and rear-wall measurement you’ll need before you pick up the drill.
How High Should Grab Bars Be Next to a Toilet?
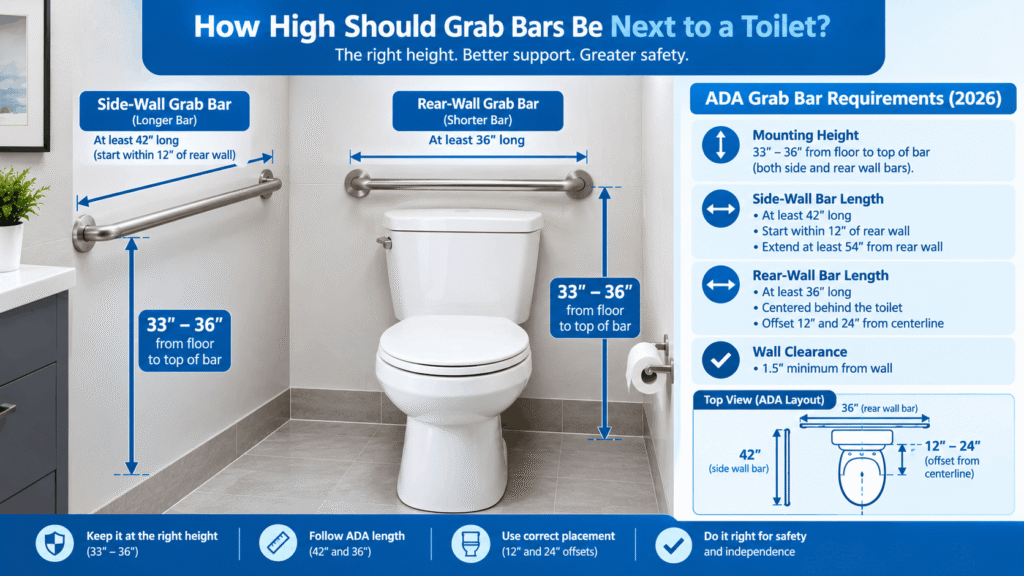
Both the side-wall and rear-wall bars mount 33 to 36 inches above the finished floor, measured to the top of the gripping surface—not the centreline of the bar and not the mounting screws.
This range has zero tolerance at either end, unlike most ADA minimum/maximum specs. The U.S. Access Board’s guidance on Section 609.4 notes that because 33″–36″ is already a range, installers don’t get extra wiggle room past 36 inches or under 33 inches—the range itself is the tolerance.
If you’re setting the height for a specific person rather than a public restroom, taller users often do better closer to 36 inches, and shorter users or wheelchair users with a lower seated posture may do better near 33 inches.
Side-Wall vs. Rear-Wall: Where Each One Goes
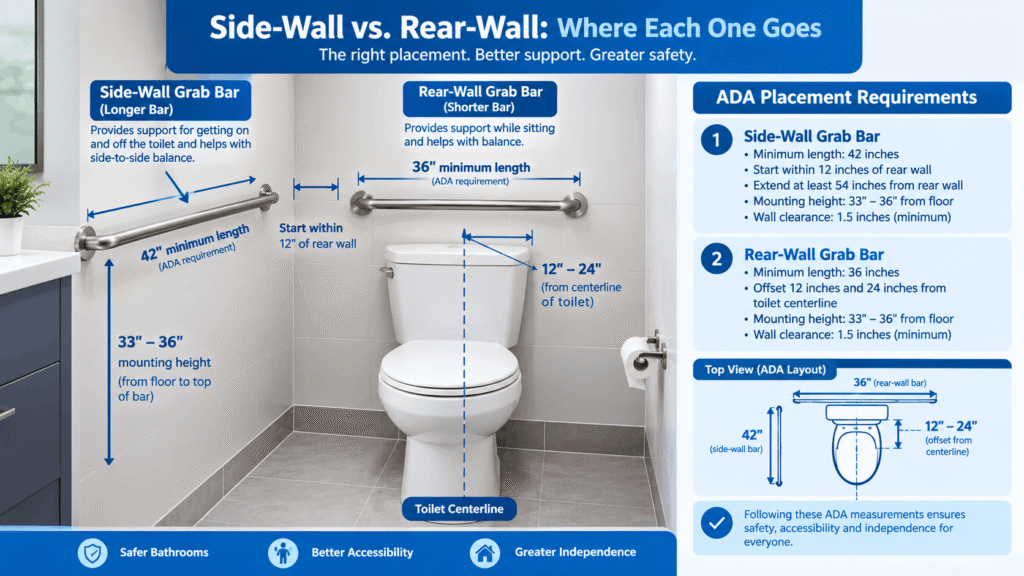
The side-wall bar does the heavy lifting during standing and sitting — it’s the one a person leans their full weight into. The rear-wall bar mostly supports balance and pivoting while already seated.
Small bathrooms complicate both of these measurements, especially when the side wall is shorter than 54 inches or a vanity cuts into the space. If your layout is tight, our guide to grab bar placement in small bathrooms walks through how to adapt these distances without going out of compliance.
For the full breakdown of every ADA height and length spec across toilets, showers, and tubs in one reference, see our complete ADA grab bar requirements chart.
Wall Clearance and Load Requirements
The space between the grab bar and the wall has to be exactly 1.5 inches—not a minimum you can exceed freely, and not something to eyeball.
A grab bar has to withstand 250 pounds of force at any point along it, applied in any direction, without the bar, its fasteners, or the wall structure failing. That’s the standard set in Section 609 of the 2010 ADA Standards for Accessible Design, the federal document these numbers all trace back to. The U.S. Access Board’s Chapter 6 guidance covers how these clearance and placement rules apply specifically to water closets.
That 250-lb figure is why clearance matters as much as it does: too tight and fingers can’t wrap around the bar; too loose and the bar can’t transfer force safely into a hand instead of the wall.
Finding the Right Spot Before You Drill
None of these measurements matter if the bar isn’t anchored into something solid. Drywall alone will not hold 250 pounds of lateral force.
Before you mark anything permanently, locate the studs or blocking behind the wall. Our stud-finding guide for grab bar installation covers how to confirm you’re anchoring into a real structure and what to do when the studs don’t line up with your marked measurements.
Common Distance and Placement Mistakes
Mistake: Centring the rear-wall bar on the toilet. The bar isn’t meant to be centred—it needs 12 inches on one side and 24 inches on the other, with the longer side facing the open transfer space.
Mistake: Measuring bar height to the screw holes. Height is measured to the top of the gripping surface. Measuring to the mounting hardware can put the actual grip an inch or more off.
Mistake: Starting the side-wall bar too far from the rear wall. If the back end starts more than 12 inches out, the bar no longer supports the sitting/standing motion the way it’s designed to.
Mistake: Assuming a 36-inch bar works on both walls. The rear wall needs 36 inches minimum; the side wall needs 42 inches minimum. Using a 36-inch bar on the side wall leaves it short of the required reach.
FAQs
What are the ADA requirements for grab bars around a toilet?
Under ADA standards, the grab bar beside the toilet should be at least 42 inches long. It should begin no more than 12 inches from the rear wall and continue at least 54 inches forward. A rear-wall grab bar should be at least 36 inches long and positioned according to the toilet centreline, with the required 12-inch and 24-inch extensions on either side. Both bars should have the gripping surface positioned 33 to 36 inches above the finished floor and maintain 1½ inches of clearance from the wall.
What is the correct height for a toilet grab bar?
For ADA-compliant installations, toilet grab bars are generally positioned so the top of the gripping surface is 33 to 36 inches above the finished floor. Measure from the completed floor surface to the gripping area rather than using the bottom or top edge of the mounting plate. Staying within the specified range is important when following ADA requirements.
Where should grab bars be installed around a toilet?
A typical ADA toilet setup uses two grab bars: one on the side wall beside the toilet and another on the wall behind it. The side bar provides support when sitting down or standing up, while the rear bar can help with stability and repositioning. Their exact length and position should follow the applicable accessibility requirements.
What mistakes should be avoided when installing toilet grab bars?
Several installation errors can reduce the effectiveness of a grab bar. Common problems include placing the rear bar directly in the centre without considering the required offset, measuring the mounting height from the wrong part of the bar, and attaching the hardware to weak drywall alone. The wall structure and fastening system should be capable of supporting the required load.
Are ADA grab bar rules required in a private home?
In most cases, the ADA does not impose the same accessibility requirements on an ordinary private residence that it does on covered public or commercial facilities. However, ADA dimensions can still provide a useful safety reference for homeowners. The final position can also be adjusted when appropriate to accommodate the height, reach, and mobility needs of the person using the bathroom.
Can a toilet grab bar be installed without a wall stud?
A grab bar does not always have to be fastened directly into a stud, but the alternative fastening system must be properly rated for the wall material and the required loads. Ordinary drywall anchors are not an appropriate substitute for a properly engineered grab-bar mounting system. When suitable studs or structural blocking are available, fastening into them is generally the preferred approach.
What to Do Next
Before installing the bar, make sure the marked locations can safely support the expected load and that you have selected the correct installation hardware.
Use our grab bar stud-testing guide to identify suitable structural mounting points. Then review our grab bar drill bit size guide to choose the appropriate bit for the fasteners and wall material you’re working with.