
Introduction
How to Install a Grab Bar Without a Stud Your stud finder just beeped in the wrong spot or stayed silent, and the grab bar still has to go exactly where the wall is hollow. You can mount it safely without a stud, and this guide shows the three methods that hold, plus the shortcuts that fail the moment someone slips.
Table of Contents
Quick Answer: Yes, you can install a grab bar without a stud, but only with solid wood blocking or toggle-style anchors rated for grab bar loads. The accepted benchmark is 250 pounds of force, and plastic drywall anchors fail under a fall. If a solid hold can’t be confirmed, hire a pro. The same rule applies behind a fiberglass tub surround.
What You Need to Know
- A grab bar needs a solid structure behind it; not necessarily a stud: wood blocking, load-rated toggle anchors, or a bar-kit anchor system all qualify.
- The accepted strength benchmark is 250 pounds of force on the bar, the fasteners, the mounting hardware, and the wall behind them.
- Plastic drywall anchors and bare screws are not safe substitutes, even when they feel tight.
- Hole sizes vary by anchor kit (1/2 inch for one toggle kit, 1 1/4 inches for another system), so your kit’s instructions override any generic number.
- Soft or crumbling walls, and any bar meant for someone at high fall risk, are jobs for a professional.
Can You Install a Grab Bar Without a Stud?
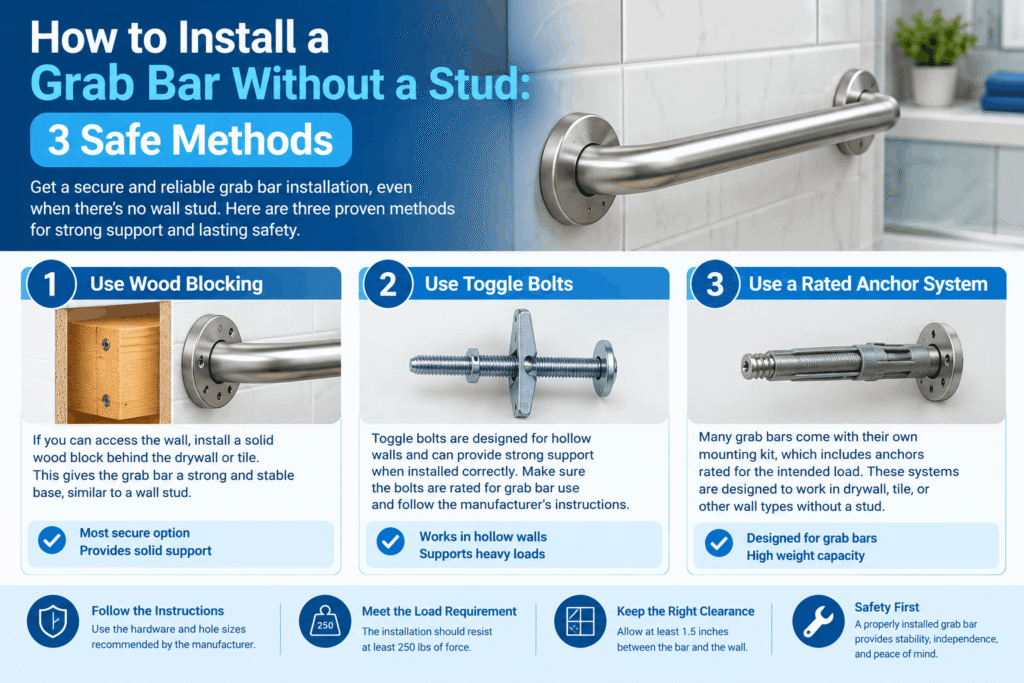
Yes. A grab bar needs solid structural support behind it, and that support does not have to be a stud. Three options provide solid support for the grab bar, listed from strongest to most convenient:
- Wood blocking is added behind the wall, so you can open or reach the back of the wall.
- Toggle-style anchors rated for grab bar loads; for hollow drywall you can’t open.
- An anchor system supplied with the bar, designed for the surface it mounts on.
A stud is still the first choice when it aligns with the mounting location.
Do Grab Bars Need to Go Into Studs? Why 250 Pounds Matters
No, studs aren’t mandatory, but the mounting must resist 250 pounds of force. According to the U.S. Access Board’s ADA guide to toilet rooms, accessible grab bars are held to a structural strength requirement, and the ADA Standards apply that force to the bar, the fastener, the mounting device, and the supporting structure.
The 250-pound rule covers the wall itself, not just the bar. A bar rated for far more than 250 pounds is no safer if the drywall behind it crumbles. A bar held by plastic anchors can also feel rock solid when you tug it and still pull out in a fall.
| Spec | Benchmark | Why it matters |
|---|---|---|
| Structural strength | 250 lb of force at any point on the bar, fastener, mounting device or supporting structure | The wall and anchors count, not only the bar. |
| Bar diameter (round) | 1¼ to 2 inches | Fits a secure grip |
| Wall clearance | 1½ inches between the bar and the wall | Room for a hand, and no arm trapped behind the bar |
| Mounting height | 33 to 36 inches above the finished floor | Reachable for most users |
| Rotation | The bar must not turn in its fittings. | A spinning bar gives no grip. |
Source: U.S. Access Board, ADA Standards for Accessible Design, Section 609 (Grab Bars).
The ADA Standards govern accessible design in covered buildings, and a private home generally isn’t required to follow them. Installers still use them as the safety benchmark, and you should check local code for your situation.
How Do You Rule Out a Stud First?
Spend three minutes here before choosing a hollow-wall method. A stud a few inches from your planned spot can settle the whole anchor question.
- Scan the wall with a stud finder. Sweep horizontally across the planned bar area at mounting height, and mark both edges of any stud. Studs are often spaced 16 inches center to center, so one stud usually means another nearby.
- Shift or tilt the bar. A grab bar can be mounted vertically, horizontally, or diagonally. Moving a mounting end a few inches, or angling the bar, can put one end on a stud. Each mounting point still needs its own solid hold.
- Consider a longer bar. A longer bar spreads the mounting ends farther apart, which can land both on studs.
- Check behind your drilling spots. Use a stud finder with wire detection, and keep clear of pipes. Older homes don’t always follow current wiring and plumbing layouts.
Which Method Fits Your Wall? (No-Stud Decision Chart)
Match your wall to a method before you buy hardware. Your wall type decides the method, so identify what sits behind the bar first.
| Your wall | Best method | Hardware class | Confirm before drilling. | Stop and call a pro if… |
|---|---|---|---|---|
| Drywall: you can open the wall or reach the back. | Solid blocking | Wood brace between studs, plus screws into it | Framing layout behind the wall | Wiring or plumbing is in the way. |
| Drywall, no access to the back | Load-rated hollow-wall anchors | Toggle-style anchors rated for grab bars | Rated for your wall thickness; open space behind the wall (one kit lists 1-7/8 in minimum) | The drywall is soft, damaged or crumbling. |
| Tile over a hollow wall | Rated anchors through the tile | Carbide or diamond bit plus rated anchors | Hole size from the anchor instructions | The tile is cracked, or the layer behind it is unknown. |
| Fiberglass or acrylic surround | The bar kit’s own anchor system | Kit anchors built for the shell | Shell thickness requirement in the kit instructions | The shell flexes, and the kit gives no guidance. |
| Not sure what’s behind it. | Don’t drill yet. | Stud finder, then a cavity check | Everything in this row’s neighbours | Any doubt, especially for a high fall-risk user |
Save or screenshot this No-Stud Decision Chart. It covers which method fits drywall, tile and fiberglass walls.
[EMAIL CAPTURE POINT] Want this chart as a printable wall check and install checklist for the bathroom? Join the Grab Bars Guide newsletter, and we’ll send it to you. (Link the checklist once it’s created.)
Method 1: Add Solid Blocking Behind the Wall
Blocking is the strongest no-stud option. Blocking is a wood brace fastened between studs behind the wall, used to give the bar solid backing anywhere along its length.
It requires access to the back of the wall, such as an open wall during a remodel or a reachable space on the other side. If the wall can’t be opened, move to Method 2. A carpenter should size and place the brace for your wall.
Method 2: Use Load-Rated Toggle Anchors in Drywall
This is the standard DIY route for hollow drywall, and the word that matters is “rated.” A toggle anchor is a fastener with a metal channel that braces against the back of the wall, used to carry load where no stud exists.
Not every toggle is tested for grab bar loads, so buy the anchors the manufacturer specifies for grab bars. One widely sold toggle-style kit calls for a 1/2-inch hole, two anchors per mounting end (four per bar), and at least 1-7/8 inches of open space behind the wall. Your kit’s numbers may differ.
Method 3: Use the Anchor System Built Into the Bar Kit
Some bar kits ship their own anchors, engineered for a specific surface. Follow the kit exactly, because the hole size and anchor type are designed as a set.
Moen’s SecureMount system, for example, uses a 1-1/4-inch hole and a plastic guide that seats the anchor inside the wall. Substrate requirements, such as the thickness of a fiberglass or acrylic shell, are listed in the kit’s instructions, so read them before you drill.
How Do You Install a Grab Bar With Hollow-Wall Anchors? (Step by Step)
Check behind the wall, mark and drill to the kit’s hole size, set the anchors, seal behind the flange, and then bolt the bar on. Every number below should be checked against your own kit’s instructions, which override this guide.
Tools: power drill, drill bit sized to your kit (1/2 inch for one toggle kit), level, pencil, painter’s tape, screwdriver, silicone sealant, and the anchor kit.
- Read the anchor kit’s instructions first. Hole sizes differ between systems: 1/2 inch for one toggle kit, a 1-1/4-inch hole saw for Moen’s SecureMount. Use the size your kit states.
- Check behind the wall. Confirm there is no wiring or plumbing in the drilling zone and that the open space behind the wall meets your kit’s minimum (1-7/8 inches for one toggle kit).
- Position the bar and mark the holes. Put painter’s tape on the wall, hold the bar or template in place, check it with a level, and mark the centre of each hole. The ADA range is 33 to 36 inches above the floor; confirm the right height for the person who will use the bar.
- Drill to the kit’s size. For drywall, drill straight through at each mark. One kit recommends two holes per mounting end, which means four anchors per bar. For tile, use a carbide or diamond bit, drill slowly, and keep hammer mode off.
- Set the anchors. For a toggle kit, slide the metal channel through the hole, pull the straps until the channel rests flat against the back of the wall, ratchet the cap until it sits flush, then snap off the straps.
- Seal behind the flange. In a shower or tub area, apply a bead of silicone sealant to the back of each flange before fastening. It keeps water from reaching the wall cavity.
- Fasten the bar. Line up the flange holes with the anchors and insert the bolts one end at a time. Tighten until the bar sits snug against the wall at both ends.
- Cover and seal. Snap the flange covers on and run silicone around their outer edge in wet areas. One manufacturer advises leaving a small gap at the bottom edge so trapped water can drain. Let the sealant cure for the time printed on its label before any water reaches the bar.
What Changes on Tile or Fiberglass Without a Stud?
The hollow-wall logic stays the same. What changes is how you drill and seal the surface.
Tile
Drill with a carbide or diamond bit, slowly and without hammer mode, with painter’s tape over each mark. Seal every hole with silicone before fastening so water can’t get behind the tile. The full walkthrough is in our guide to installing a grab bar on a tile shower wall.
Fiberglass or Acrylic
A fiberglass or acrylic surround often has a hollow gap between the shell and the wall framing. The thin shell flexes, so the shell alone cannot hold a bar.
Use the bar kit’s anchor system built for the shell, or fasteners that reach structure, and drill carefully to avoid cracking the surface. See our guide to installing a grab bar on an acrylic tub surround for the surface-specific steps.
Common Mistakes (and Shortcuts to Avoid)
The most dangerous mistake is trusting a bar because it feels tight. Plastic drywall anchors and bare screws pass a gentle tug and fail under the sudden load of a fall.
- Using standard plastic anchors or screws in drywall. Neither is built for grab bar loads.
- Skipping the “rated” check on toggles. A toggle from a general hardware bin isn’t automatically tested for grab bars.
- Ignoring the kit’s hole size. Oversized holes weaken the grip of the anchor.
- Skipping silicone behind the flange. Water reaching the wall cavity causes hidden damage, and one manufacturer notes it can rust hardware.
- Drilling tile in hammer mode. It cracks the tile.
- Buying a bar that spins in its fittings. The ADA Standards require that it not rotate.
- Treating a suction-cup bar as a permanent substitute. Read our answer on suction-cup grab bars for bathtubs first.
How Do You Choose a Grab Bar That Works With Your Anchor Plan?
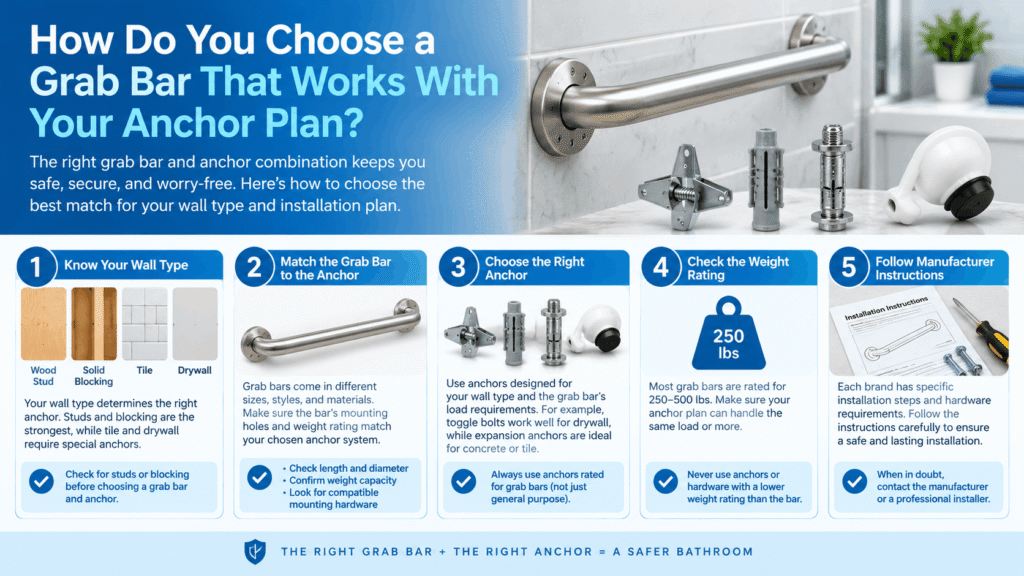
Pick the bar after you’ve picked the anchor method, because the flange design has to match it. Choose a round bar between 1¼ and 2 inches in diameter that doesn’t rotate in its fittings, per the ADA Standards.
Check that the bar either ships with a compatible anchor system or accepts the rated toggle anchors you plan to use. For wet-surface grip, look at textured finishes. If you’re shopping for an older family member, our best grab bars for seniors roundup compares bars on grip and installation fit, and our best textured grab bars list covers wet-hand grip.
[AFFILIATE DISCLOSURE: add if those pages use affiliate links]
How Do You Know It’s Secure, and When Should You Call a Professional?
The secure bar shows no movement at the flange when you press and pull firmly by hand. Any wobble, flex, or gap means stop and fix it before anyone relies on the bar.
A hand check can’t prove the 250-pound benchmark, which is why a professional’s confirmation is worth having when the stakes are high. Call a pro when:
- The drywall is soft, damaged, or crumbling.
- You can’t rule out wiring or plumbing behind the drilling spots.
- A fiberglass shell flexes, and the kit gives no guidance.
- The bar is for someone with a real fall risk and no stud lines up.
- The kit instructions are unclear or missing.
A professional finds the structure or adds blocking, drills tile and fiberglass without cracking them, uses correctly rated fasteners, seals the holes, and confirms the bar holds real weight. For broader steps beyond grab bars, see the CDC’s fall prevention resources for older adults.
FAQs
Can You Install a Grab Bar Without Studs?
Yes, but the wall must provide a secure anchor. If a wall stud is unavailable, suitable alternatives may include solid wood blocking or a purpose-built mounting system designed and rated for grab bars. The complete installation should meet the applicable load requirements. Avoid ordinary plastic drywall plugs or screws fastened only into drywall, as they may pull loose under pressure.
Is It Necessary to Attach Grab Bars to Wall Studs?
Not always. Wall studs offer dependable structural support, but other mounting methods may work when they are specifically designed for the wall construction and intended load. Solid blocking installed behind the wall is another reliable option. Before choosing hardware, check the grab bar manufacturer’s instructions and applicable safety standards. The ADA Standards specify that grab bar installations must resist a force of 250 pounds applied at any point, including the supporting structure and fasteners.
Can You Mount a Pull-Up Bar Without Studs?
Pull-up bars and bathroom grab bars serve different purposes. A bathroom grab bar helps someone maintain balance or move safely in a bathing area, whereas a pull-up bar must withstand repeated exercise loads. Do not use bathroom grab bar installation advice to mount exercise equipment. Instead, follow the pull-up bar manufacturer’s mounting requirements and confirm that your wall can safely support the intended use.
How Much Weight Can a Drywall-Mounted Grab Bar Support?
There is no single safe weight limit for every drywall-mounted grab bar. Its performance depends on the mounting system, drywall condition and thickness, installation quality, and supporting structure. The ADA’s 250-pound requirement is a force-resistance criterion for the complete installation, not a guarantee that any anchor rated for a particular weight will be suitable. Use a mounting system explicitly approved for the application and follow its published specifications.
Are Standard Drywall Anchors Safe for Grab Bars?
Ordinary plastic wall plugs and general-purpose drywall anchors should not be used for a grab bar unless the manufacturer explicitly approves that exact system for this purpose. A bar may feel secure during a light pull but fail when someone suddenly puts substantial body weight on it. Choose structural backing or a purpose-built, appropriately rated mounting system and install it exactly as directed.
What Should You Do If Your Grab Bar Is Already Installed With Plastic Anchors?
Do not rely on the bar for support until the installation has been corrected. Arrange to remount it using suitable structural backing or an approved mounting system. If the existing holes have weakened or cracked the drywall, repair the damaged area before reinstalling the bar. In a shower or bathtub, also restore the waterproof seal around any mounting holes to help prevent moisture damage.
What Is the Correct Height for Installing a Grab Bar?
For applicable ADA installations, grab bars are generally positioned 33–36 inches above the finished floor, measured to the gripping surface. A minimum 1½-inch gap must remain between the bar and the adjacent wall. The ideal placement in a private bathroom also depends on the user’s height, mobility, and whether the bar is beside a shower, bathtub, or toilet. Check the relevant placement guidance before drilling.
Recommended Next Steps
Once you’ve identified a suitable mounting method, choose a bar and plan its location before beginning installation.
- Choose a suitable model: Explore our best grab bars for seniors guide for options suited to different bathroom needs.
- Compare materials: Read our best stainless steel grab bars guide to learn about options for moisture-prone bathrooms.
- Plan the location: Determine the appropriate height and position for the shower, bathtub, or toilet area before installing the bar. Make sure the mounting surface and hardware can safely support the intended use.