
Introduction
The shower walls are solid tile; a family member needs support getting in and out, and you’re worried one wrong drill pass will crack a tile you can’t replace. You can handle this. The work is three things: find what’s behind the tile, use the right bit, and anchor the bar to structure. How to Install a Grab Bar on Tile Shower Walls
Table of Contents
Quick Answer: To install a grab bar on a tile shower wall, locate a stud (or add blocking), tape and mark the holes, drill with a carbide or diamond tile bit at low speed in non-hammer mode, seal the holes with silicone, and then fasten the flanges into the structure. The mounting should hold 250 pounds of force, the ADA benchmark.
What You Need to Know
- Tile is only the surface. The bar must be anchored to a stud, blocking, or a grab-bar-rated anchor.
- Use a carbide or diamond tile bit, low speed, and hammer mode off.
- The ADA places horizontal bars 33–36 inches above the floor, with 1½ inches of wall clearance.
- Seal every hole with silicone so water can’t get behind the tile.
- No stud where you need the bar? Use blocking or rated anchors, or call a professional.
Can You Put a Grab Bar in a Tile Shower?
Yes, if the bar is fastened into a stud, blocking, or a grab-bar-rated anchor and not into the tile alone. The tile is only a surface; the structure behind it carries the load.
Tile adds two risks: cracking during drilling and water entering through unsealed holes. The right bit and sealed holes manage both.
One detail surprises many homeowners. Section 609.8 of the 2010 ADA Standards for Accessible Design requires 250 pounds of force to be resisted at any point on the bar, fastener, mounting device, or supporting structure. The wall is part of the system. The Access Board’s guide to ADA bathing rooms explains that these standards target public and commercial facilities, so they aren’t mandatory in a private home. Installers still use them as the benchmark.
What Should You Check Before Drilling Into Tile?
Check where the studs are, where the bar belongs, and where pipes run. A bar held by anything weaker than structure can feel solid on install day and still pull out in a fall.
How do you find studs behind tile?
Run a stud finder across the tile, then confirm by measuring from a known stud or outlet box on the adjoining wall. studs are commonly 16 inches apart centre to centre, though some walls use 24. Tile and the layers beneath it can make a single reading unreliable.
Mark each stud on painter’s tape. Our guide to finding studs for grab bars covers the process in more detail. Keep clear of the area around the shower valve and showerhead, where supply lines run.
Where should the bar go?
The ADA places the top of a horizontal bar’s gripping surface 33–36 inches above the floor, with 1½ inches between the bar and the wall. Round bars should be 1¼–2 inches in diameter. The ADA figures are in the Access Board’s bathing rooms guide. To measure for your own shower, follow our guide on how to measure grab bar height.
The Tile Shower Anchoring Decision Chart
| What you find behind the tile | Safe method | Who should do it |
|---|---|---|
| Studs behind both flange positions | Fasten flanges into studs. | DIY-capable |
| Stud behind one flange only | Slide the bar to hit studs, or back the second flange. | Use caution. |
| No stud, wall open from behind or during a remodel | Add wood blocking. | Usually a professional |
| No stud, wall closed | Grab-bar-rated anchor, per the maker’s spec | Professional advisable |
| Unsure what’s behind the tile | Stop and get an assessment | Professional |
| Never use | Plastic expansion anchors, Molly bolts, and screws into drywall | n/a |
Save or screenshot this anchoring decision chart. It shows which method fits your wall before you pick up the drill.
What Tools and Materials Do You Need?
You need basic tools and one tile-specific bit. Gather everything first so you don’t stop mid-hole.
- Stud finder, level, tape measure, marker
- Painter’s tape
- Drill, plus a carbide-tipped or diamond-tipped tile bit (check the packaging for the tile types it’s rated for)
- Silicone sealant and caulk gun
- The screws and flange hardware that came with your bar
- Eye protection
How Do You Attach a Grab Bar to a Tile Wall?
Plan on roughly an hour of active work for a stud-backed install, plus sealant cure time. Each step protects either the tile or the wall.
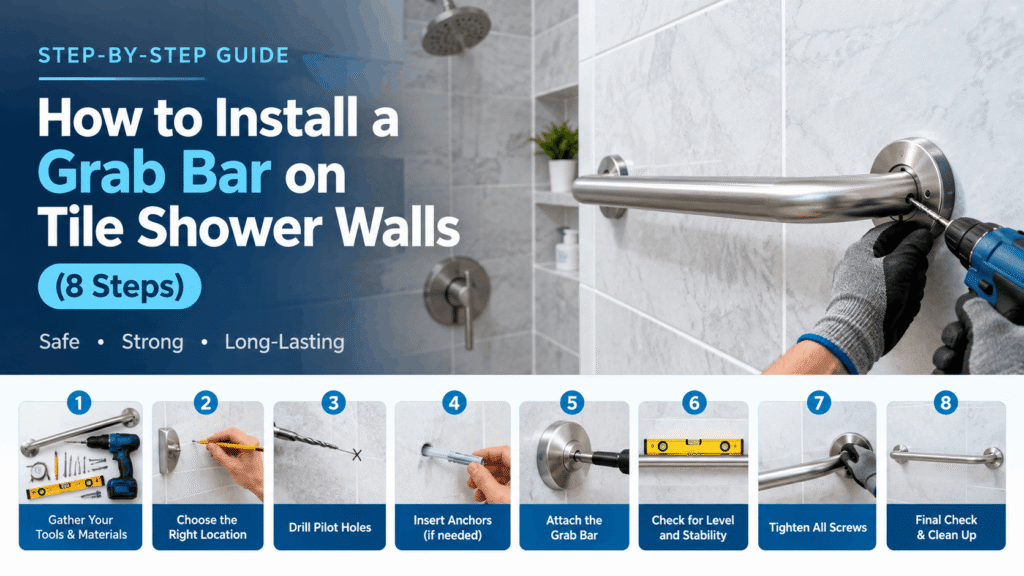
- Mark the height with painter’s tape. Stick a level strip where the top of the bar will sit, 33–36 inches above the shower floor.
- Locate and mark the studs. Use the stud finder and your cross-check, and mark stud centres on the tape.
- Mark the screw holes. Hold the flange against the tape and mark each hole. Slide the layout sideways until the holes land on stud centres, not edges. The tape also keeps the bit from wandering.
- Drill a pilot hole through the tile. Use the tile bit at low speed, with hammer mode off and with light, steady pressure. Pause often so the bit doesn’t overheat.
- Drill to final size. Step up only as far as the screw instructions require. Once through the tile and backing, drill the stud pilot hole at the diameter the screw specifies.
- Seal each hole with silicone. Do this before fastening, so water can’t reach the wall.
- Fasten the flanges. Drive screws snug, not forced. Confirm the bar is level and sits 1½ inches off the wall.
- Seal around the flange edges. Let the silicone cure before anyone uses the bar. Many silicones need about 24 hours, so check your tube’s label.
How Do You Drill Through Tile Without Cracking It?
Use a carbide-tipped or diamond-tipped tile bit at low speed, with hammer mode off. Hammer action is the setting to avoid on tile.
Diamond bits are the usual choice for dense porcelain. Carbide-tipped bits are common for softer ceramic. Start with a small pilot hole, then step up one size at a time.
How Do You Install a Grab Bar in a Tile Shower Without Studs?
You have two safe routes: wood blocking or grab-bar-rated anchors. Never rely on plastic anchors, molly bolts, or drywall screws.
Blocking is a wood brace fastened between two studs behind the wall, used to give a bar solid backing wherever it lands. It’s the strongest option, but it needs access to the wall’s back side, such as during a remodel.
A grab-bar-rated toggle anchor is a heavy-duty anchor its maker has tested for grab bar loads. Confirm in the manufacturer’s documentation that it’s approved for your wall build-up (tile over backer board) and your load. If the wall is closed and you can’t confirm that, hire a professional.
How Do You Test a Grab Bar After Installing It?
Wait for the sealant to cure, then check the bar by hand. The 250-pound figure is a design standard, not something to test at home.
Push down, pull outward, and twist the bar firmly. Then lean part of your body weight into it with your feet planted on the floor. The bar shouldn’t shift, click, or flex at the flanges. If it does, remove it and re-anchor, using our guide to why a grab bar is loose.
What Are the Most Common Mistakes and How Do You Fix Them?
Most problems come from anchoring, drilling technique, or sealing. Skipping silicone in the holes is the quietest mistake, because the damage stays hidden inside the wall.
| Problem | Likely cause | Fix |
|---|---|---|
| Tile cracks at the hole | Hammer mode, heavy pressure, or an oversized bit | Stop, move the bar, and repair the tile [CONTENT GAP: how to repair cracked tile after drilling]. |
| Bit skates on the glaze | No tape, or starting too fast | Add painter’s tape and start slowly with light pressure. |
| Bit drops into a hollow space | No stud there. | Use the no-stud methods above. |
| The bar wobbles after installation. | Screws missed the stud, or anchors aren’t rated. | Remove and re-anchor. |
| Moisture or stains near a flange | Unsealed holes or flange | Remove, reseal, and reinstall. l |
| Study finder readings jump around. | Tile or backing interference | Cross-check by measuring from a known stud |
When Should You Call a Professional Instead?
Call one whenever you can’t confirm the structure behind the tile. A bar that fails in a fall is worse than no bar, because people trust it with their full weight.
Hire help if there’s no stud and the wall is closed, if you don’t know what’s behind the tile, if the tile is already cracked, if plumbing sits near your marks, or if the person using the bar has a high fall risk. The CDC’s fall resources offer broader guidance on preventing falls at home. Follow your bar’s own instructions wherever they differ from this guide.
Frequently Asked Questions:
Can You Install a Grab Bar on a Tile Shower Wall?
Yes, you can install a grab bar on a tiled shower wall, but the mounting method matters. The screws must connect to a wall stud, solid wood blocking, or a properly rated grab-bar anchoring system approved for the specific wall assembly. Tile by itself is not strong enough to provide reliable support.
How Do You Mount a Grab Bar on Shower Tile?
Start by choosing a comfortable, accessible position for the bar. Use painter’s tape to mark the drilling points and locate the wall studs before positioning the mounting flanges.
Drill carefully through the tile with an appropriate tile bit, using low speed and steady pressure. After passing through the tile, follow the fastener manufacturer’s instructions for the underlying wall material. Apply compatible silicone around the mounting holes as needed, then secure the bar into the intended structural support.
How Can You Install a Grab Bar on Tile When There Are No Studs?
When studs are unavailable at the desired location, you need an anchoring solution designed for the actual wall construction. One option is to open the wall and install solid wood blocking behind the tile. Another may be a specialized grab-bar anchor rated for the specific tile and backer-board assembly.
What Is the Safest Way to Drill Through Shower Tile?
Careful drilling helps prevent cracked tiles and costly repairs. First, mark the drilling location with painter’s tape to help keep the bit from wandering.
Choose a carbide-tipped bit for compatible ceramic tile or a diamond-tipped bit for harder materials such as porcelain. Start at a low speed, keep hammer mode switched off, and apply gentle, consistent pressure. Avoid forcing the bit through the surface, and follow the bit manufacturer’s guidance for cooling and drilling technique.
Can You Install a Grab Bar Without Drilling Into Tile?
Some grab bars use suction cups or adhesive instead of screws, but these products work differently from structurally mounted grab bars. Suction depends on a suitable, smooth, nonporous surface and a reliable seal, while adhesive systems depend on the strength and durability of the bond.
Neither should automatically be treated as equivalent to a grab bar securely attached to structural backing. Check the manufacturer’s instructions and intended use, especially if the bar will be used by someone who could fall.
For a closer look at the limitations of suction-mounted products, read our guide on whether suction cup grab bars are safe for a bathtub.
Can You Install a Grab Bar on a Fiberglass Shower Wall?
Yes, but fiberglass shower surrounds require a different approach from tiled walls. The fiberglass panel may have an empty space between the shell and the wall framing, so fastening a bar only to the thin surround may not provide the necessary support.
Before drilling, determine how the wall is constructed and how the mounting hardware will connect to a suitable structural support. Follow the installation instructions for the particular surround and grab bar, including the correct sealing method.
For surface-specific instructions, see our guide to installing a grab bar on a fiberglass tub wall.
How Long Should You Wait Before Using a Newly Installed Grab Bar?
Wait until any silicone or other sealant has cured for the period specified on its packaging. Some products require approximately 24 hours, while others need longer depending on the formula and conditions.
After curing, inspect the mounting flanges and check for visible movement. Do not rely on a simple hand test or a partial-weight test as proof that the bar can safely support a person. If the bar shifts, the fasteners loosen, or the wall cracks, stop using it until the mounting system has been properly inspected and corrected.
What to Do After Installing Your Grab Bar
Installation is only one part of making a shower safer. The bar also needs to be positioned correctly, remain firmly attached, and suit the person who will use it.
- Check the placement: Use our guide to measuring bathtub grab bar height to understand the key positioning considerations.
- Watch for movement: Inspect the mounting points periodically. If the bar becomes loose, consult our guide on why a bathtub grab bar becomes loose.
- Choose the right bar: If you are improving bathroom safety for an older adult, explore our comparison of the best grab bars for seniors to compare different options.
A properly selected and securely installed grab bar can make everyday shower routines easier, but safe installation and suitable structural support should always come first.